Blueberry Jam Heart Shaped Doughnuts


(This post may contain affiliate links at no extra cost to you. This is my way to keep this site afloat and free of ads. Read my full disclosure here.)
A sugary mess is always the best
You know it’s not Valentine’s in here if there aren’t Heart Shaped Doughnuts in my kitchen!! This year I sticked to my bready dough and filled them with a sweet elderflower blueberry jam. I also used the Tangzhong method for the dough to make it soft and fresh for days, not only the day they were fried. I’m also telling you how you can make these overnight and a few cool tips on how to reheat doughnuts to make them taste even better than when fried!
Maybe it’s because everyone loves these doughnuts so much, from you my readers to my neighbors in the first floor, that I couldn’t help to make these for Valentine’s. There’s something magical about them and ironically, I think it is the amount of work behind them, haha!! After you finally sit down with a doughnut in one hand, a cup of coffee on the other one and sugar sticked all over in at least 7 fingers you know it’s going to be a special moment! The effort is totally worth it!!
I did this blueberry jam with elderflower for the filling, but you can leave it out completely, just leave out the cornstarch as well or use half. You can also make my classic raspberry jam, my silky lemon curd, my easy Italian meringue or use something as simple as Nutella.
You can cut this recipe in half if you want to make a small batch. The jam can be also cut in half, even if you make the whole dough recipe this would be a good idea if you want to use different fillings and use the blueberry jam for some doughnuts.
This is a comprehensive post so I’m going straight to it today! If you have made one of my doughnuts recipes before, you have probably read most of these tips already. So yo know the drill, If not, I’ll leave you here with a picture of how to get organized when making these so you can organize beforehand and understand what will be happening in the kitchen. Not gonna lie, it’s a whole event!
How To Make Heart-Shaped Doughnuts with Homemade Jam
Make the blueberry filling, ideally the night before or a few days in advance. Not only it will have a better consistency to fill the doughnuts but you won’t have to deal with this while making the doughnuts.
When making the doughnuts, start by melting the butter so it’s cooled down when the mix is ready for it.
Mix the flours because next…
You’ll make the Tangzhong. Take out 3 tablespoons of the flour mixture and mix it with ½ cup of water and heat in the microwave in 15-second intervals until you have a pudding like consistency. It should look glossy and smooth. It needs to be cooled down so I like to place the bowl in the fridge and stir every few minutes 3 to 4 times while I prepare the rest of the ingredients. It doesn't need to be chilled completely, but it needs to feel fresh to the touch.
Serve the buttermilk or whole milk and heat it just for 10 to 15 seconds to force the temperature down. It will be cool enough when you need to add it to the mixture. Also, you can submerge eggs in hot tap water for 5 minutes to bring to room temperature.
Prepare the rest of your ingredients and make the dough.
While the mixer is doing its job, slightly grease with a neutral oil (vegetable, canola, grapeseed) the bottom and sides of a medium glass or ceramic bowl with a paper towel.
For the first proofing the dough will need about 1 ½ to 2 hours to rise, depending on the temperature of the room it’s placed in. It should be between 70° to 75°. Keep it cozy by wrapping the bowl with kitchen towels or throw blankets.
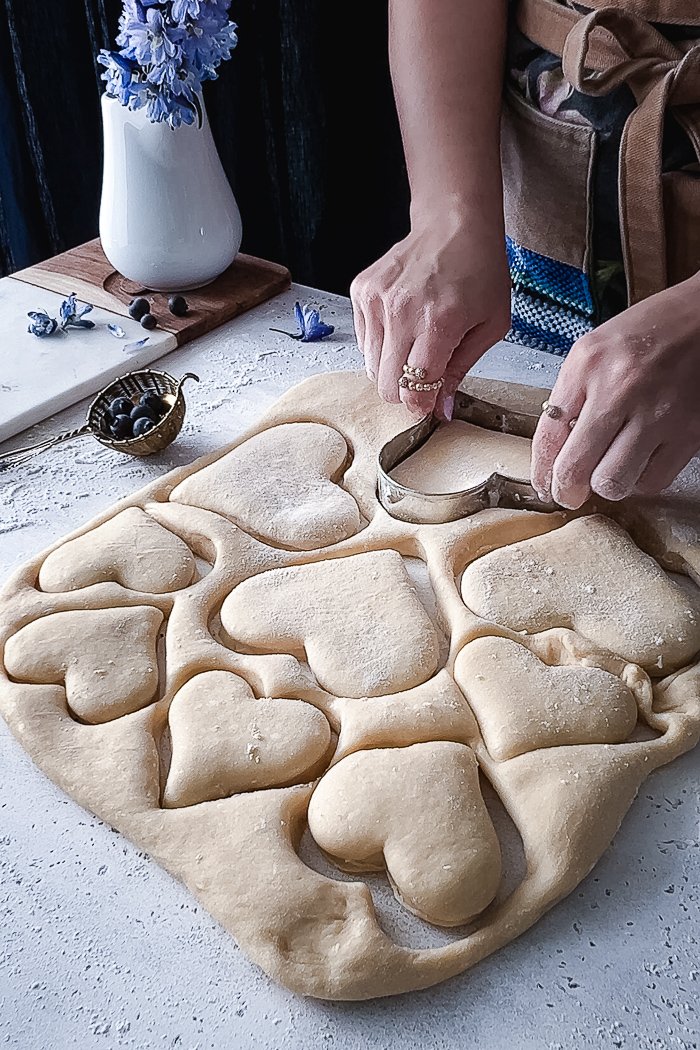
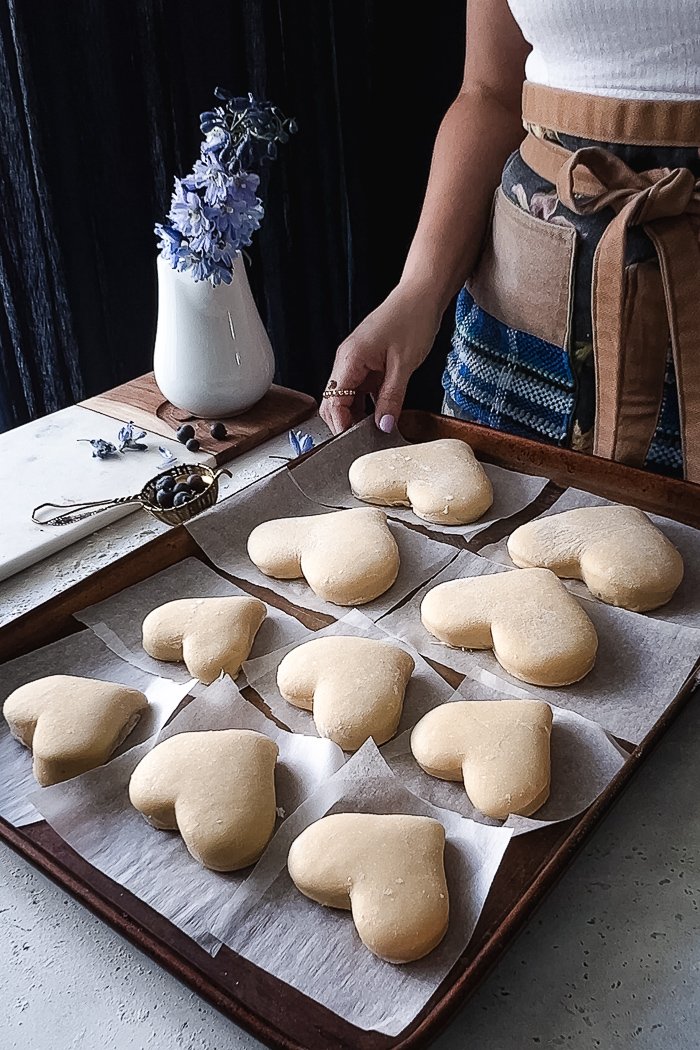
Stretch the dough a bit thicker than ¼”. Using a heart shaped cookie cutter cut the dough and transfer each doughnut to a baking sheet with parchment paper. Cover with another parchment and what you were using to keep the dough warm. Let them rise for 45 minutes to an hour.
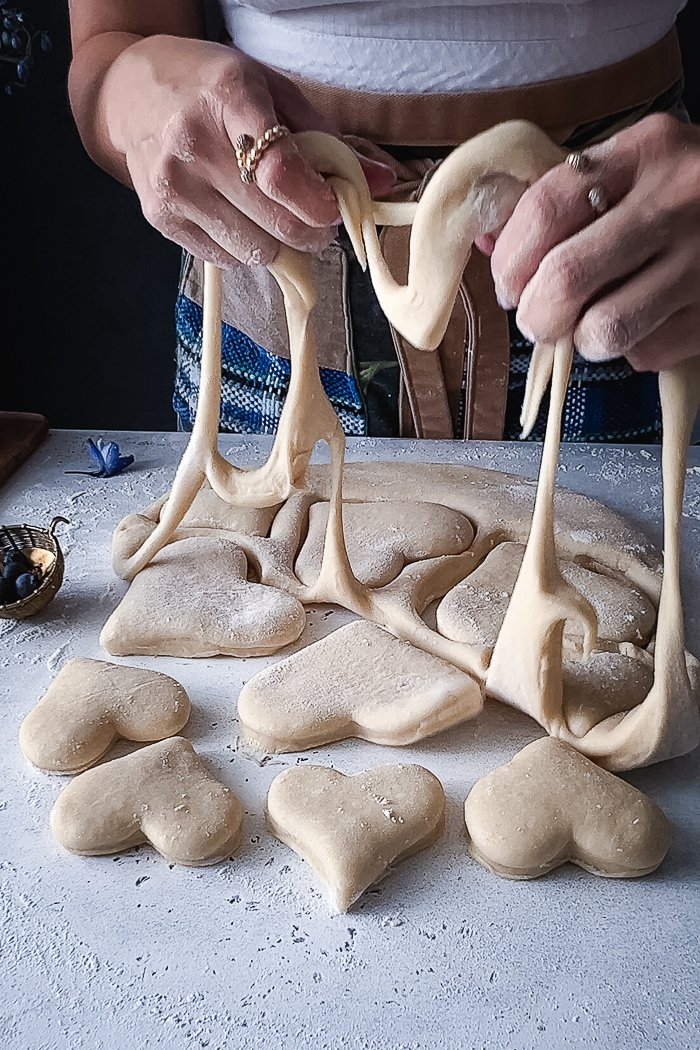
Never discard dough!: Even if this is a no-no in the baking world, I never discard dough. Reshape dough, stretch again and make mini hearts, “doughnuts holes” or simply dough knots. Structurally and technically they are not the perfect dough but I still fried them and covered in cinnamon sugar and I’ve always think they are even better!
Prepare all you need in advance: While the doughnuts are proofing, prepare your work area. You will need another tray or large dish lined with paper towel to rest the doughnuts after fried, a dish to place sugar for coating and a cooling rack (ideally placed over another baking sheet to prevent a sugary mess over your counter) to rest the sugar coated doughnuts.
Fry doughnuts in a deep pot in very hot oil until they are deep golden brown for that crusty outside. Transfer doughnuts over paper towel.
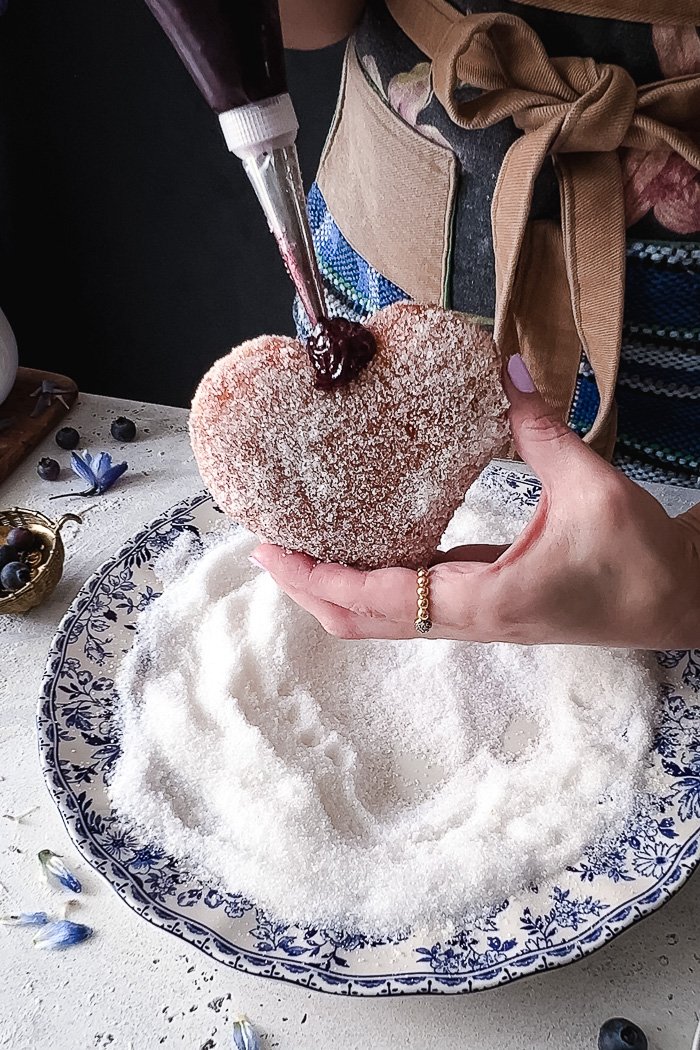
In order for the sugar to stick, you need to coat the doughnuts as soon as you can manage touching them without burning your fingers. If they cool down too much the sugar won’t stick. I like to coat a batch while I wait on others to be fried. If your doughnuts cooled down and the sugar is not sticking, rub the surface with a bit of the cooking oil with the back of a spoon or your fingers (make sure it’s not super hot) or brush some melted butter and try coating them again.
Use a pastry bag and a pastry filler or thin nozzle to fill each doughnut. You can even have different fillings for more fun! In Shop the Post below I left the tools you need to fill them.
Don’t store doughnuts airtight because the sugar will get moist and start dissolving. Keep them in a fresh area in your kitchen and protect them with a loose lid or paper towel.
Overnight options!
There are two ways you can make these doughnuts overnight:
You can make the first proofing and after an hour put the dough in the fridge. The next morning take it out and let it come to room temperature and finish rising, about an extra hour because the dough is chilled.
Strech and cut the dough, put the doughnuts to rise and then fry, acoording to instructions.
You can stretch and shape the dough after the full first proofing. Let them rise for 15 minutes to keep that yeast going and then place the baking trays in the fridge overnight. The next morning let them come down to room temperature and finish rising, about an extra hour beacuse the shaped dough is chilled.
Fry according to instructions.
Doughnuts for the next days and beyond!!!
The Tangzhong helps make any yeasted dough taste delicious and fresh for days after being baked or fried.
However, I will share this trick that will leave you wanting to eat doughnuts more than the day they were fried. First you need to make an educated guess and put apart the doughnuts you think are not going to be eaten the same day. Leave those completely uncoated. The day you want to eat them, place them in a countertop oven before heating at 350°, plus heat for 5 to 10 minutes. Take them out and brush them liberally with melted butter and then coat with sugar or cinnamon sugar. The texture and taste this reheating brings out are so goood!!
Shop the Post
Set of small to medium heart-shaped cookie cutters (these are exactly the same ones I have, I love how the shape is more curly than traditional cookie cutters hearts).
Precut Parchment Paper (exactly the ones I use and they will save you so much time and work).
Staub French Oven (mine is Grenadine).
Couplers for pastry bags (I like to use them).
Pink stand-mixer (it’s the season of love after all!)
Hope you have a blast doing these!! And even a bigger blast eating all of them! Please tell me if you are planning to make these in the comments below! Until the next one!
(Remember to leave your email when you make a comment to receive a notification as soon as I get back to you. Don’t worry, this will not add your email to my email list.)


Blueberry Jam Heart Shaped Doughnuts
Ingredients
Blueberry Eldelflower Preserves
(If only filling some of the doughnuts cut this recipe in half. Store any leftover for other bakes, pancakes, scones or French Toast. It will be good for months in the fridge.)
◯ Blueberries, fresh or frozen – 3 cups, 373g
◯ Natural granulated sugar – ½ cup, 100g (if not using elderflower syrup use ¾ cup, 150g)
◯ Freshly squeezed lemon juice – 1 ½ TBSP, 16g
◯ Unbleached flour – 2 TBSP, 21g
◯ Cornstarch - 1 TBSP, 11g (if not using elderflower you can omit the cornstarch)
◯ Elderflower syrup - 1 to 1 ½ TBSP, 20g to 25g
Doughnuts
◯ Butter - 8 TBSP, to be melted and cooled down
◯ Unbleached all-purpose flour - 2 ½ cups (362.5g)
◯ Unbleached bread flour - 1 ½ cups (217.5g)
◯ Water - ½ cup (114g)
◯ Buttermilk or whole milk, at room temperature - ¾ cup (207g)
◯ Fine sea salt - 1 ½ Tsp
◯ Organic large eggs, at room temperature - 2
◯ Natural granulated sugar - ½ cup (110g) + extra for coating
◯ Instant yeast - 1 packet, 11g
◯ Vanilla extract - 1 Tsp
◯ Neutral oil for frying (vegetable or grapeseed)
Details
Yield:
about 10 to 14 medium to large heart shaped doughnuts, plus dough for “doughnuts holes”.
Total time:
5 hours, including kneading and proofing times.
Active time: 15 minutes to prepare the dough mix, 20 minutes to stretch and shape the dough, 20 minutes to fry the doughnuts.
Frying time:
20 minutes
Equipment:
stand mixer, parchment paper, baking sheet, heart-shaped cookie cutters, large deep pot or skillet.
Steps
To make the blueberry elderflower jelly:
In a small saucepan combine the 3 cups of blueberries, the ½ cup of sugar and the 1 ½ tablespoon of lemon juice and bring to a gentle boil over medium heat. Cook for about 10 minutes. Remove from heat and add the 2 tablespoons of flour and the tablespoon of cornstarch, moving frequently. Add the tablespoon of elderflower. Return to heat and cook until achieving a thick consistency, 2 to 3 minutes more. Remove from heat and keep moving for 30 seconds more. Let it cool completely or chilled in the fridge before filling the doughnuts. You can make this a few days in advance.
To make the doughnuts:
Melt butter and let it cooling down.
In a large bowl mix the 2 ½ cups of all purpose flour with the 1 ½ cups of bread flour.
To make the Tangzhong, mix the ½ cup of water with 3 tablespoons of the flour mixture in a small bowl or measuring cup. Heat in the microwave in 15-seconds intervals until you have a smooth pudding-like paste, probably 2 to 3 times. Stop when mixture is thick and glossy with a pudding-like consistency. Let it cool down (see notes above to make it cool down fast).
Gather the rest of the ingredients so everything is at room temperature, or at least not very chilled. Remember you can get the buttermilk warmed up in the microwave and submerge eggs in hot tap water to make everything come down to room temperature, see notes for the tip).
In the mixing bowl of a stand mixer with the wire attachment, pour the 8 tablespoons of melted butter, the ¾ of buttermilk and mix the 1 ½ teaspoon of fine sea salt. Add the 2 eggs, the ½ cup of sugar, the instant yeast, the 1 teaspoon of vanilla extract and the cooled down Tangzhong. Mix until well combined.
Pour about 3 cups of the flour and mix until combined. Switch to the hook attachment and add the remaining flour. Knead in medium-low speed (#2 in the Kitchen Aid) for 10 to 12 minutes. Dough should not stick to the walls but it will stick to the bottom. In the middle there should be forming large stands of dough when the hook tries to pull it from the wall of the bowl.
While the dough is mixing, use a paper towel to grease the inside of a glass or ceramic medium bowl with vegetable oil.
Dust your hands with a bit of flour because this dough is tacky. Take the dough out and fold in the edges, placing that side down on the greased bowl. Cover with plastic wrap or a kitchen towel and loosely wrap bowl with a puffy kitchen towel or throw blanket. Place in a warm area with no big air draft. Let the dough rise and double in size, about 1 ½ to 2 hours.
When the dough is ready, dust with enough flour a clean flat surface. Punch the dough (it will deflate) and scrape it out over the surface with the same side up. Loosely shape it as a rectangle. Dust flour over your rolling pin and over the dough, making sure the corners of the dough don't feel tacky. Using your hands (you may rub some flour on them as well) stretch the dough until it’s a bit more than ¼” thick. Using a heart shaped cookie cutter cut as many doughnuts as you can, medium or large. Make sure the dough is cut well by separating the area around the cutter. Transfer each doughnut to a baking sheet or large tray lined with parchment paper. Cover with another parchment or smooth piece of cloth and let them rise again for 45 minutes to an hour.
Frying and assembly:
Fill a deep pot or skillet pan more than half with oil. Heat it over medium-high heat until a thermometer marks 340°, oil will start to have ripples and will start to look thinner.
Optional: While oil is heating, cut the parchment paper below each doughnut. You are going to drop each doughnut into the oil using the paper. This way you don’t affect the shape of it.
Drop in the oil 2 to 3 doughnuts at a time. Remove parchment paper with kitchen thongs. Let the doughnuts fry until deep golden brown, 2 to 3 minutes. Using a large slotted spoon or spider strainer turn the doughnut and cook the other side, about 2 minutes. Remove from oil and place them over paper towel. Remove a doughnut and add a doughnut before removing the next one, never leave the oil empty. If at some point the oil gets too hot, turn heat to medium for a few minutes and keep frying. Increase and decrease temperature again if needed.
While doughnuts are frying, coat with plenty of sugar the ones that already have lost some of the heat. Place them in a cooling rack so the sugar won't get moist with their steam. Doughnuts are done!
As soon as they are cooled down, fill them with your favorite filling.
Doughnuts will be good for a week stored in a fresh and dry area.
