Angel Food Cake with Blackberry Whipped Cream


(This post may contain affiliate links at no extra cost to you. This is my way to keep this site afloat and free of ads. Read my full disclosure here.)
Angel Food Cake is a beautiful kind of cake. Is airy, foamy and it has a velvety that feels like a marriage between a pound cake and a cheesecake. It’s made solely with egg whites as the leavening agent and no butter, oil or milk. I topped this delicious angel food cake with a blackberry whipped cream for a sweet and tart contrast. It’s a lovely cake and you will be loving it after the first bite!
You may be wondering what’s the difference between an angel food cake and a regular cake. What makes them different is that angel cake has no fat in the batter, even fat coming from eggs because this cake has no egg yolks, so it’s a non-fat cake. It only uses egg whites as a leavening agent. A lot of them! That’s what makes this cake extremely fluffy and light. Another reason why angel food cake is so light is because it’s made with cake flour, which has less protein than all-purpose flour. Cake flour develops less gluten, making the structure of the cake way lighter.
Even if it's an angel from the sweets Heaven, angel food cake is pretty finicky. One of the many things you will hear is that you need to use fresh egg whites. And while that would be amazing in an ideal magical world, the reality is that there’s a chance most of the egg yolks, if not all, will be wasted. That’s why I prefer to use my own freshly frozen egg whites instead. You know I do a lot of cheesecakes, curds and many recipes that call for egg yolks. So what I do is freezing the egg whites in plastic freezer bags. Different from egg yolks, egg whites are super stable after frozen and they have worked really well for me when making meringues, pavlovas or waffles.
If I would use fresh egg whites for making an angel food cake, that would have mean 10 to 12 egg yolks that chances are I won't use them immediately. Sure you can make a curd, but a basic recipe uses only 1 or 2 yolks. Even if you duplicate it, you’ll still have 5 egg yolks to spare. And the egg yolks’ texture gets really compromised even after a few hours in the fridge. So let's face it, there’s a big chance most of the egg yolks, if not all, will end up being wasted. That’s why for making angel food cake, I prefer to use egg whites from the stack of my freezer instead of using fresh ones and loosing lots of egg yolks in the process.
Of course, if you can use fresh egg whites without the waste issue that would be even better. I just wanted to let you know that, if frozen egg whites is what you have, please don’t miss out on baking a beautiful angel food cake because I’m here to tell you that it’s of to use those and you can go for it!
Why you can use frozen egg whites when making Angel Food Cake
The main reason you will hear that it’s better to use fresh egg whites is because supposedly they won’t rise properly, compromising the structure of the cake. This has not been my case. I just take extremely well care of other factors that affect the rise of the cake as well.
The size of the sugar matter, and it should be small. If you can’t find super fine cane sugar you can pulse yours in the food processor until making the granules pretty fine.
EVERYTHING has to be free of fat. Saying it loud for the people in the back! When separating eggs, always make sure there are no traces of egg yolks in the white. That bit of fat can compromise the structure of the cake. Also, wash your bowl, beaters and cake pan with tap hot water if possible. Never use a plastic bowl because plastic absorbs oil, use always metal or glass.
Always include an acidic component such as cream of tartar (a white powder that you will find in the spices aisle). Make sure it's very fresh. If possible buy a new one. I actually bought a new one for this recipe, even if mine wasn’t expired, but it has been opened for a few months now.
Use a tubular metal loaf cake pan. Never use a non-stick pan. Read point #2.
I think I’ve made my case for using frozen egg whites in angel food cake.
Now let me guide you through the steps you need to take when making this cake:
How to make an angel food cake:
Egg whites need to be at warm room temperature. If using frozen, thaw them by submerging the plastic bags in a bowl of hot tap water. This will keep them warm. If using fresh, cover the bowl with a paper towel and place it in a warm area.
Wash with soap and hot tap water the bowl and beaters you will be using for mixing.
Pulse natural granulated sugar (or white cane sugar) a few times in the food processor. It will not look as much, but it’s enough for the sugar to dissolve quickly into the egg whites.
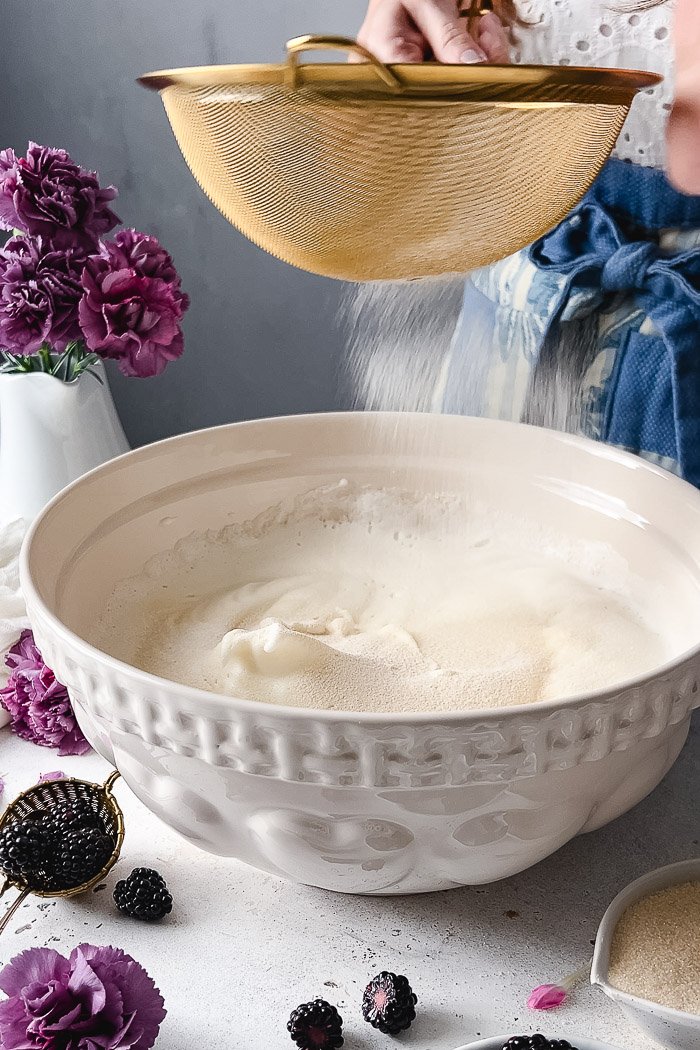
Sift the cake flour with the salt 2 times.
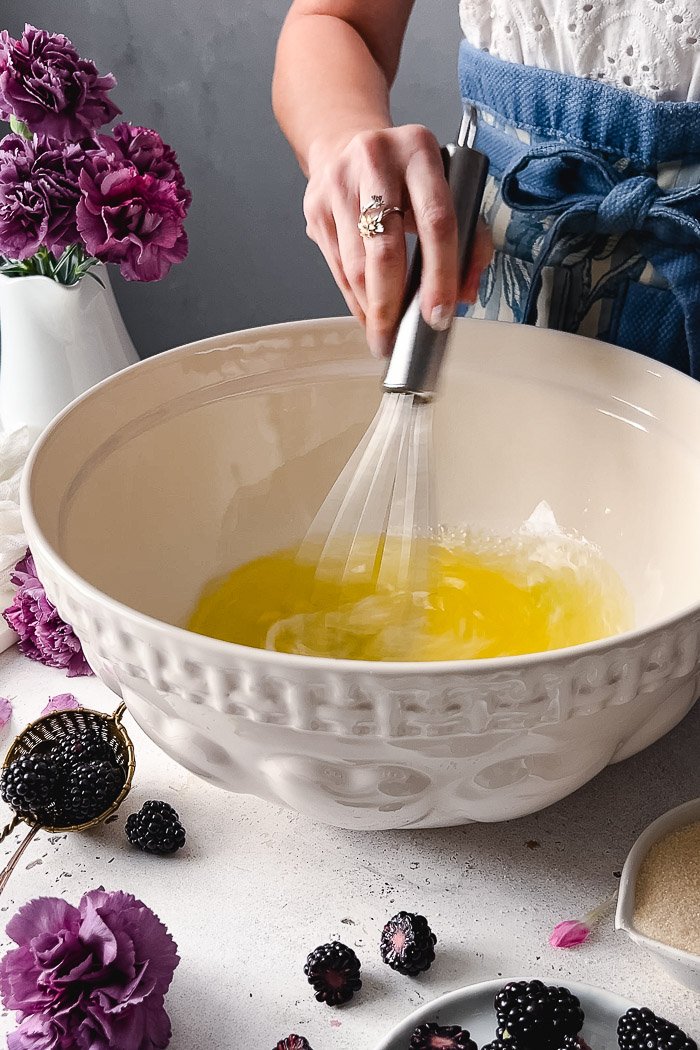
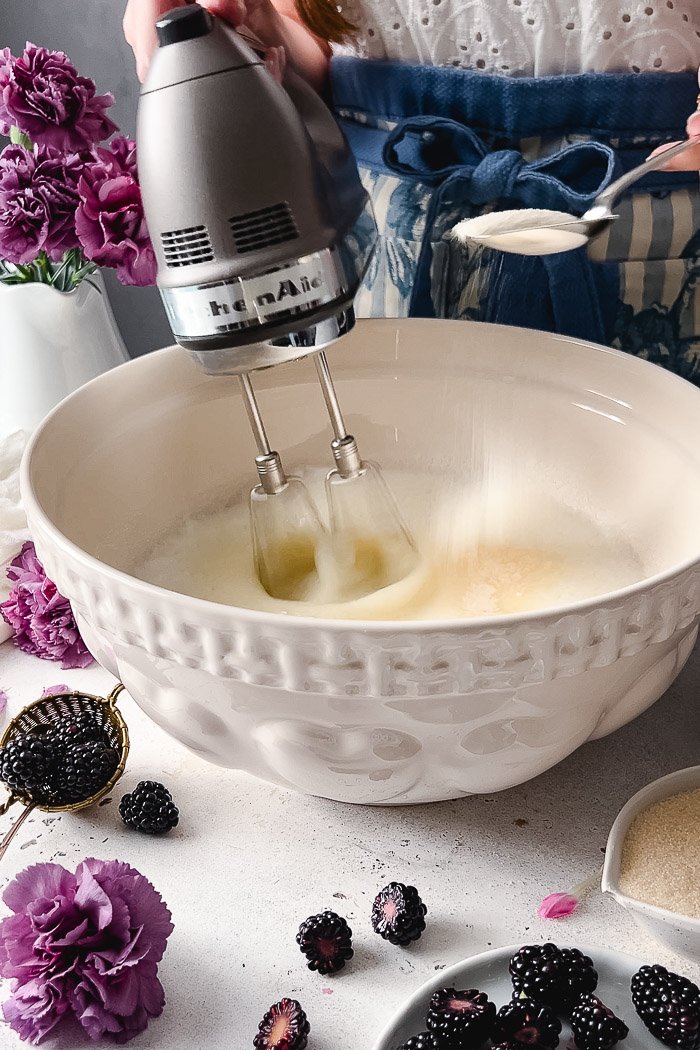
Start working the egg whites. It’s important to NOT OVERBEAT them, other wise they won’t be able to expand in the oven. What you are looking are soft peaks, which means that when you hold up the beaters, the egg whites will be firm around the wire but the tip won’t stay up and will fall back because they are still soft. To prevent over beating, I recommend start beating them with a hand whisk and when they are pretty foamy and ready for the sugar, switch to the electric mixer to bring them to that soft peaks state.
I added some water to the egg whites, which isn’t common in angel food cakes. I learned about that tip through the Alton Brown’s angel food cake recipe. The water helps the sugar dissolve better plus, since this cake has no fat, water helps in making it softer and moist.
Add the sugar slowly and gradually. One to two tablespoons in each additions is enough, making sure it's dissolved before adding more.
At this point you may add any non-fat based flavoring such as vanilla extract or orange water as I did here.
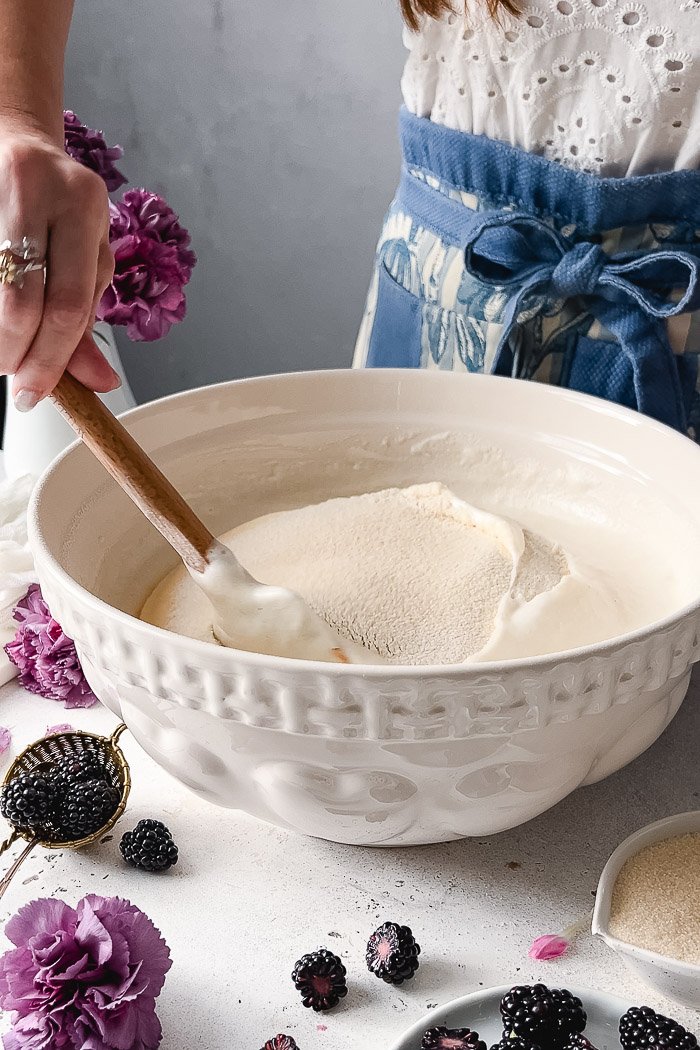
With a large sieve, sift the cake flour and salt mixture on top of the egg whites. This will be a third sifting for the flour. Add just to cover the egg whites, maybe a tad more. Using a silicon spatula mix with a folding motion. As soon as incorporated, repeat with more flour until you mix it all.
SUPER IMPORTANT! Make sure you are, gently, scrapping the bottom of the bowl and the sides. One of the main reasons angel food cake collapse is becase the flour hasn’t been well mixed with the egg whites. Do it gently, but please make sure the flour is well incorporated and that you can’t see streaks of it over the egg whites.
Transfer gently to the tubular loaf cake pan. Instead of pouring the batter on the cake, think of dropping it through the pan. You can’t smear the batter to distribute it because the batter can deflate. Barely shake the pan if necessary.
Bake for 35 to 45 minutes.
When out of the oven, wait a couple of minutes and then flip the pan over a serving plate. Leave it like that until cooled down completely, between an hour or 2. Cake could be stuck but it will release when cooled down. When cooled down, remove pan and tube.
You may serve with fresh fruits and whipped cream as I did here. You can also eat it alone with a simple dust of confectioner’s sugar.
This cake will be good for a day in a dry cool area. After that, store it airtight in the fridge.
Shop the Post
My angel food cake pan. The use of this particular pan is key for success!
A large food processor so you can pulse the sugar all at once.
3 recipes I think you’ll love if you’re loving this one:
Super Soft Jumbo Blueberry Muffins with Earl Grey Tea
Lemon Yogurt Cake with Crunchy Sugary Glaze
Mini Olive Oil Carrot Cakes
*
I hope this post on my take for making an angel food cake inspire you to make your own, no matter if it’s your first time ever or you have made dozens of them. You’ll be obsessing over the velvet like texture. Put it on top of you baking list!
And please if you make it share it with us herein the comments and in Instagram (@devamadeo), TikTok (@DevAmadeo) or Facebook (@DevAmadeo)! Love to see what you make!
(Remember to leave your email when you make a comment to receive a notification as soon as I get back to you. Don’t worry, this will not add your email to my email list.)


Angel Food Cake
Ingredients
Angel food cake
◯ Natural granulated sugar - 1 ½ cup + 1 TBSP, 312g
◯ Cake flour (not self rising flour) - 1 cup + 1 TBSP, 125g
◯ Fine sea salt - ¼ Tsp
◯ Egg whites, at room temperature - 12, 390g
◯ Water - ¼ cup, 60g
◯ Cream of tartar - 1 ½ Tsp/5g
◯ Orange water (you may use vanilla or any other non-fat based extract) — ½ Tsp
Blackberry whipped cream
◯ Heavy whipping cream - ½ cup, 120g
◯ Blackberries - about 1 cup, 150 g
◯ Natural granulated sugar - ¼ cup, 50g
◯ Confectioner’s sugar - 2 TBSP, 14g
Details
Yield:
about 12, ½” slices
Total time:
3 hour
Active time: 20 minutes to make the cake batter, 10 minutes to make the blackberry whipped cream
Baking time:
35 to 45 minutes
Equipment:
traditional metal angel food cake pan, stand mixer or electric hand mixer, large sifter and silicon spatula
Steps
Angel food cake:
Preheat oven to 350°. Wash and rinse the utensils, beaters and bowl you’ll use. Pat dry well, especially the ones that will be in direct contact with the sugar before added to the egg whites.
Sift twice the 1 cup plus 1 tablespoon/125g of cake flour with the ¼ teaspoon of salt over a medium bowl.
Pulse 4 to 5 times the 1 ½ cup plus 1 tablespoon/312g of sugar in the bowl of a large food processor already attached to its base.
Add the 12/390g of egg whites, the ¼ cup/60g of water, the 1 ½ teaspoon/5g of cream of tartar and the ½ teaspoon of orange extract in a metal or glass bowl. Start beating the with a hand whisk until very foamy. Switch to an electric hand mixer or stand mixer and mix in medium speed for 30 second to make the whites rise a bit more.
Slowly and gradually, start adding 1 to 2 tablespoons of sugar at a time, waiting for it to be well incorporated before adding more. Stop halfway and gently scrape the bottom to make sure all sugar has been incorporated. As soon as all sugar has been added, beat a bit more until soft peaks forms (see note #5).
Sift over the egg whites some of the cake flour mixture, enough to cover them. With a silicon spatula gently fold until well combined. Repeat several times until all flour has been added. Make sure to scrape the bottoms and sides of the bowls a few times between additions to make sure all the flour is mixing well.
Gently transfer batter to the tubular loaf cake pan, dropping it through the pan instead of pouring all of it in 1 spot. Barely shake the pan if necessary to make the batter even.
Bake for 35 to 45 minutes, until a toothpick comes out clean wne you insert it through the center of the cake.
Retire from oven and wait 1 to 2 minutes. Turn upside down over a serving plate and leave it until cools down completely, between 1 and 2 hours. Gently remove pan and tube.
Top with fresh sweet whipped cream and fresh fruits or just with a dust of confectioner’s sugar.
Cake will be good for a day in a dry cool area. After that, store it airtight in the fridge.
Blackberry whipped cream:
Put the ½ cup/120g of cream, the bowl and whisk to chill.
Place the blackberries with the ¼ cup/50g of sugar in a small sauce pan and heat in medium heat until blackberries’ skin has broken and the juice has become syrupy, 10 to 15 minutes. Pass through a sieve and discard the seeds Let it cool down completely.
Using a whisk attachment beat the chilled cream with the 2 tablespoons/14g of confectioner’s in sugar in medium speed (#4 in teh Kitchen Aid) until frothy and thick but still pourable, like a milkshake. Stop the mixer and drizzle some of the blackberry syrup, depending on how saturated you want the cream. Keep beating until soft peaks form. Do not over beat because cream will keep getting stiffer while you handle it over the cake.
Smear cream over cake. Drizzle any remaining blackberry syrup if desired and decorate with fresh blackberries.
